Sewing Instructions for an Ordinary Apron - Plain and Sturdy
Rachel ManringYou Can Make a Useful Apron

Using things that you made yourself is satisfying, which is a theme of this website. This apron is a simple and enjoyable project. It is sturdy and practical, with a touch of personality from a cotton print. It is designed for plenty of coverage and has a large front pocket. The ties can tie in the back, or be wrapped around the waist and tied in front.
There are two design options for using quilting cotton. 1) The apron can be lined, or 2) the edges can be trimmed with bias tape.
A third option would be to use only the main fabric with no lining or trim. If you choose this option, you will simply hem all the edges of the apron and then attach the neck strap, apron ties, and pocket.
Materials
I like cotton canvas from bigduckcanvas.com. The 10 oz cotton works well. The pocket and the neck strap can be lined with the same fabric as the apron, or you can use a complementary fabric. In the bias tape trimmed example, I used a slightly contrasting scrap of linen I had left from another project for the pocket and neck strap.
You will need:
1 yard of main fabric (canvas, denim, or other sturdy fabric) 45” wide
1 yard of quilting cotton if you plan to line the apron. If you are trimming the apron with bias tape, you will only need 1/2 yard of quilting cotton.
Thread, pins, scissors, sewing machine, iron
Quilting rulers, rotary cutter and bias tape tool are helpful, but optional. In some of this project, the bias tape tool will be used in strips that are not cut on the bias. Don't let this confuse you. The bias tape tool can be used with fabric that is cut on grain, as with the neck strap and apron ties. The 1/2" and 1" wide tape makers are used in this project.

Tools and materials for making an apron
Making the pattern template
The pattern template has instructions printed on it for assembling the template and cutting out the apron. If you want to make another apron, you will have the beginning instructions right there on the template for your convenience.
Download the template pages here, and print them out. Some page edges have a solid gray line and some have a gray dashed line. Cut the pages along only the gray lines and tape them together as illustrated on the template.


Template ready for use
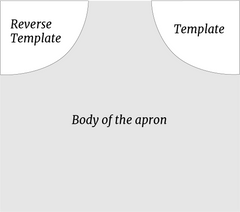
The apron is made of rectangles; a large rectangle for the apron body, a smaller rectangle for the pocket, and a thin narrow rectangles for the neck strap and apron ties. All the rectangles will be measured and cut. The pattern template is only the shape that will be cut from the upper corners of the large apron rectangle, to make the curves that shape the apron.
Cutting schematic for the apron body
Cutting out the apron
If you are using bias tape trim:
For the body of the apron, cut a rectangle 34” wide and 30” high from main fabric.
Cut the 1/2 yard of quilting cotton in half along the shorter measurement, making two rectangles about 22” wide and 18” high. Use one rectangle for making 2" wide bias tape, the the other rectangle for cutting the lining of the pocket and neck strap.
If you are lining the apron or hemming the edges
Cut a rectangle 35” wide and 31” high from the main fabric and another one from the lining fabric (if you are using lining). This extra inch is for seam allowance in the lined apron, or for the hemmed edge.
All styles
Line up the template on the upper right corner of the rectangle and cut along the curved line. Then turn the template over and use the reverse shape on the left upper corner, as illustrated above.
For the pocket, cut a rectangle 15” wide and 10” high. If you are lining the pocket, cut the same size rectangle from the lining fabric.
For the neck strap, you will need 2 rectangles, each 2” wide by 21” long. You can cut both of them from main fabric, or you can cut one each from main fabric and lining fabric.
For ties, cut 2 strips of main fabric, each 1” wide by 38” long. You can piece these if you don’t have wide enough fabric. Join the pieces using a diagonal seam across the pieces as pictured below. This lessens the bulk of the seam.

Sew the seam along the drawn black line in the photo above.

Trim down the seam allowances.

Press the seam allowances open.
Sewing the Apron
Prepare the apron ties
Press the long edges of the ties toward the center. Use a 1/2" bias tape tool if you have one. This will make a 1/2" wide tape.

Bias tape tool in use
Fold the piece in half lengthwise and press, making a 1/4" wide apron string. Sew along the edges as pictured below.

Making the apron strings
Finish the ends with a zigzag stitch.
Prepare the pocket
For the pocket, place the pieces right sides of the main fabric and lining fabric together pieces and sew all the way around them, leaving about a 3” opening . Trim the corners. Turn the piece right sides out and iron it. Topstitch along the top edge, or as desired.
If you don't line the pocket, hem the top edge with a 1/2" hem. Press a 1/2" hem around the other three sides of the pocket.
Prepare the neck strap
For the neck strap, fold the long sides in toward the center and press the folds in place, as pictured. You can use a bias tape tool for this if you have one. The strap will be 1" wide.
Place the insides of the neck strap together and stitch them together at the edges. Make a few lines of stitching along the strap.

Finish the ends of the strap with a zigzag stitch, as pictured.

Neck strap ready to sew in place
Apron Body Option 1: Bias tape edging
This apron is pictured at the top of this post.
Make 2” wide bias tape from the 18” by 22” rectangle. Instructions for making continuous cut bias tape are here.
Press the long sides of the bias tape toward the center. A bias tape tool makes this easier.
Sew the tape around all edges of the apron, using 3/8" seam allowance. This will place the seam slightly to the right of the fold in the bias tape.

Place a pin 3/8" in from edge, sew to the pin, and back stitch.

Fold the strip up, as pictured below.

Then fold the strip down. Then stitch along the line as shown below, using 3/8" seam allowance.

Wrap the tape around one edge and smooth out the tape on the other edge, as picured below.

Pin the tape around all the edges, slightly overlapping the seam on the back side of the apron. Sew it down using the "stitch in the ditch" technique, which means sew along the edge of the tape so that the stitches are concealed between the tape and the main fabric.

Sew the neck strap in place as pictured. I use an “X in the box” stitching pattern to strengthen the stitching.

Sew the ties in place.

Apron Body Option 2: Lined Apron

Pin the neck strap and apron ties in place as pictured below. If the apron fabric has a right and wrong side, the pieces should be placed on the right side of the fabric.


Place the lining piece on top of the main fabric piece, right sides together. The strap and ties should be sandwiched in between the apron pieces. In the photo below, you see the end of the neck strap pinned in place between the main fabric and the lining of the apron.

Pin and sew all the way around the apron, leaving about a 6” opening in the lower edge. Back stitch over the neck strap and apron ties to reinforce the stitches. Turn the apron right side out and press. Topstitch around the edge of the entire apron. You can use a decorative stitch for this if you like.
Try on the apron and pin the pocket in place where you it. Sew it in place. Sew down the center of the pocket to divide it into two pockets.
Put it on and cook something.

If you enjoyed this project, sign up for my email newsletter at the bottom of this page to receive notifications of new projects and articles.